Blogarama - The Blog Directory

Winter/Summer Designs 2012

The latest summer/winter designs of 2012 ar now in the markets.

30 Seconds To Mars

Jared Leto vocalist of the band 30 Seconds To Mars has now started acting in the movies.

Street Style

The street style of London is most popular among the world.

Levis jeans-brand of quality

As the famous saying goes “clothes make a man”, Levis is the brand which gives the perfect look.

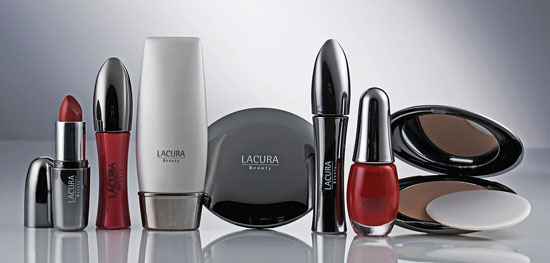
LACURA Its All About Fashion

These are emollient lipsticks: the principal ingredients are castor oil, candelila wax, and jojoba.

Monday, 31 December 2012

How to Create a Winged Eyeliner Makeup

The winged eyeliner trend has made a huge comeback due to its fabulous look so learn how to create a winged eyeliner makeup so you can look stylish, trendy and flawless every time you step out the door.

Makeup is a girls best friend as it can transform the look of a person in minutes, using cosmetic products which suit the complexion perfectly. Learning how to create a winged eyeliner makeup can help you achieve a fabulous look which is wrapped around in elegance, refinement and style.
The way the makeup is applied can make all the difference between a fabulous look or a makeup disaster, as people have different facial features, which need to be emphasized or concealed in a way which will help enhance the natural beauty without creating an artificial look.

Women have always looked adorable whenever a natural look was adopted this is why minimal makeup is timeless and will never go out of style. The winged eyeliner makeup is a very simple, yet elegant makeup which can suit all eye shapes and which can enhance beauty without using a heavy makeup. Sometimes less is more and this is exactly the case of this type of makeup.
Because learning to create a winged eyeliner makeup might seem difficult, we have put together the basic steps of this makeup style, steps which are meant to ease your work and ensure you look gorgeous every time:


  • Start by cleansing your complexion to remove any oil or dirt which might cover your skin as dirt and  makeup can penetrate the pores and cause breakouts which everyone should try to avoid as best as possible. A mild cleanser should be sufficient to cleanse your skin.


  • Moisturize your skin using a hydrating cream and conceal any blemishes which might stand out using your favorite concealer. Apply a matte foundation which matches your skin tone perfectly in order to obtain a flawless look. If you are looking for a perfectly smooth finish apply translucent powder over the foundation to set it and make it appear more velvety.


  • Take your favorite black eyeliner whether liquid, gel, or cream whatever suits your style and try to adopt a position which will allow you to see what you are doing when tracing the line. You can do this by positioning your mirror lower so you can see and work at the same time. This will help you create a similar line for both eyes as this is essential. Make sure to follow the curvy path of your waterline to determine where exactly to create the winged liner. Make a tiny mark to which the wing will start and trace the line towards the mark or the other way around on your upper lid. Use your eyeliner to unite the wing with the outer corner point of your upper lid to define the look and get the perfect finish.


  • Use your eyeliner and fill in any gaps of color to get a nice even line. To make the line appear darker you can use an angled brush to apply a black colored eyeshadow which will make the black look as jet black.


  • Apply false eyelashes or just coat your own lashes using a black colored mascara to give that fabulous dense and curled lashes look.


  • Define your cheekbones using blush and apply a red lipstick or a lip color which you think suits you best. You can even choose a natural lip color for a more natural effect.


  • This look is perfect for formal as well as casual-chic occasions so practice until you master this makeup style and wear it as often as you wish. Choose a hairstyle and outfit to match the style of your makeup so you can look fabulously stylish every single time.


    Article Source: http://www.becomegorgeous.com/make-up/make_up_basic/how_to_create_a_winged_eyeliner_makeup-2580.html

    Choosing the Right Nail Polish Color


    As with every beauty style, there are certain basic principles that need to be followed. Similarly, in choosing nail polish colors, certain considerations should be taken into account. Nail polish colors should flatter, or at least complement with the wearer’s skin tone.


    Fair Skin

    Generally, if you have a fair skin, almost every color would suit you. Be it a deep shade or a light one, a bold one or a conventional color; be free to apply whichever color you like! Still, here is a few guiding tips you may find helpful. Get soft as well as bright shades of pink, purple and red (be it vermillion color or a berry red) to flatter your complexion.

    For Dark Skin

    Dark and rich shades look good on dark skinned women. Get chocolate brown, dark purple and maroon colored nail polish for a regular look. However, if your dark complexion is on account of excessive tanning, you might even like to apply light shades of brown and pink along with other warm shades.


    Medium Skin Tone

    Being the color in-between, this skin tone can wear most shades. Nail arts look stylish on medium skin tones since the different prints and colors blends well with the color of the skin. Nail art designs that use metallic shades are recommended. Glitter nail polish, on the other hand, adds a tanned look to medium skin tones.


    Consider the season

    Like fashion trends change with the season, nail polish color does too.  For example, when choosing a color for the spring season, it’s best to opt for light, fun shades such as candy pinks. While for autumn, browns and oranges tend to look good. And for winter, go for cool shades like blues.

    Consider the occasion

    Business meetings or interviews require pale neutral colors so as not to detract attention elsewhere. For a date or girls night out, you can be daring and opt for tropical or bright nail polish color. For evening events, you can go for a dark, intense shade. And of course, you can also match your nail polish color to your outfit.


    Article Source: http://www.cosmeticsnailpolish.com/choosing-the-right-nail-polish-color/

    Wearing the Right Color for Your Skin Tone

    Ever wonder what color looks best on you? Believe it or not there is something out there called "skin tone color matching" that can help answer that question. Skin tone color matching, also known as color analysis, is the process of finding the makeup and clothes that most flatter your complexion. With this process people are divided into "seasons" based on their appearance. Skin, hair and eye color are all taken into account. So figure out what "season" you are and you'll know what colors will be more flattering.
    So, what category do you fall under? All skin tones can be categorized as either "cool" or "warm." If you have a cool skin tone then your skin will have pink or blue undertones and any visible veins will look blue. Platinum or silver looks better than gold on a cool skin tone. With a warm skin tone, a person will have yellow undertones and their veins will appear green. Gold is the metal of choice for warm skin. Once you figure out if you are warm or cool, then it is time to determine if you are "clear" or "muted." A person with clear skin will normally have a large contrast between their hair, skin and eyes. This skin will have a slight translucent quality to it. Muted skin will not have as much of a contrast. With muted skin you might see ash tones, and it will appear softer in color than that of a clear skin tone. Knowing if you are "warm" or "cool" and "clear" or "muted" will determine what season you are a part of.
    The first of the skin tone seasons we'll look at is winter. Winter skin is cool and clear. Think of very stark and dramatic skin. Asians and Africans often fall into this category. Caucasians with very pale skin and dark hair will fall into this category as well. Winters look best in true white, true black, cool grays, navy blue, deep reds, bright pinks, jewel tones (emerald, royal blue, royal purple), and icy pastels. Colors to avoid include beige, orange, gold, brown and other washed out shades. Winter skin tone will look faded and ashy in these colors.
    A summer skin tone is cool and muted. People with pale pinkish skin, ash blonde or brown hair, and light eyes will fall under this category. A summer could also have a strong complexion that tans easily. Summers are mostly natural blondes. Summer skin tone has a low level of contrast between eye, hair and skin color. Pastels, neutrals, and muted colors look best. Lavender, rose, mauve, pale yellow, and light blue are a few examples of flattering muted colors for the summer skin tone. Colors to avoid include black and orange. Also, other intense, vivid colors will be too harsh and drown out a summer skin tone.
    An autumn skin tone is warm and muted. People with light golden skin, red or brown hair, and brown eyes will be considered autumns. An autumn might also have darker honey colored hair or golden blonde hair with blue eyes that have a gray or turquoise cast. These people will burn easily in the sun. Autumns look best in earth tones that are rich and muted. Think of colors you would see on autumn leaves and spices. Caramel, beige, burnt orange, gold, dark reds, olive, ivory, camel and rich brown look great on autumns. Cool shades should be avoided. They will give you a pale appearance. Pink is extremely unflattering. Clear, bright colors and black and white will make you look faded and should be avoided as well.
    A spring skin tone is warm and clear. Someone with light blonde, auburn, or strawberry blonde hair and clear light blue or green eyes will fall into this category most times. Springs have extremely light, ivory skin. Freckles and rosy cheeks are seen in springs as well. If you can't decide whether you are a spring or autumn, most times autumns have dark eyes while springs have pale eyes. Pale, soft colors look best on springs. Ivory, peach, true reds, clear blues, camel, light pink, coral, golden yellow, golden brown, aqua and bright greens are all flattering on a spring however. This skin tone does not go well with dark, dull colors. Black and white will also be too contrasting for a spring skin tone.
    Hopefully this will give you a hint as to what color looks best with your skin tone. Remember, these are just general guidelines. Sometimes a color that isn't supposed to look good on you does and you look fabulous. You need to use your own discretion here and ask a friend with good taste for their opinion. Time to go color yourselves girls and guys


    Article Source: http://voices.yahoo.com/wearing-right-color-skin-tone-466340.html

    Tuesday, 18 December 2012

    Zeebra or Tiger Print : Incredibly Easy DIY Nail Art Idea

    Here at MD Fashion, one of our most popular posts of all time is our tutorial on Leopard Print : Incredibly Easy DIY Nail Art Idea and Butterfly Print I love the look; it’s so simple and fun, and animal prints are getting hot again. To follow along the same vein, I decided to do a similar animal print nail tutorial. This time: ZEEBRA or TIGER stripes!


    What You Need…

    • White nail polish
    • Black nail polish
    • Clear top coat nail polish
    • Thin paintbrush (from craft/dollar store), dotting tool (from beauty supply store), or toothpick
    • Nail polish remover
    • Q-tip

    Directions…

    1. Start by applying the top coat. This will help the white polish from looking streaky.
    2. Now, apply 2-3 coats of the white polish. This can be kind of tedious, as you wait for each coat to dry, but it’s the best way to get a crisp white base for your nails.
    3. Now’s the fun part. If you’re using a paintbrush, wet it with water before dipping it in the black paint to make a thin point. Start your zebra pattern. I find it helps to have a basic image of zebra print in front of you as you do it. Use short strokes and gradually build up the stripes. If you need to, practice on a piece of scrap paper first.
    4. Once the stripes are dry, carefully add one more layer of top coat.
    5. To finish, dip the Q-tip in the nail polish remover and clean up the edges of your fingertips to remove any smeared polish.

    Mix It Up…

    I love this look with different color combinations. The photo above (credit) uses white  as the base (which wouldn’t require the first step, and less coats in step 2). For a tiger look, simply switch to an orange or gold base. It also looks good with a silver base, or with a white base and cream stripes, so the pattern is barely noticeable. If you get really good at it, try applying the zebra stripes to only your french tips! The possibilities are endless. Following are some examples of color combinations.


    With White Base....


    Mixed Patterns With White Base...


    Zee Mixed With Golden...


    Nail Art With Submerged Purple And White Base...


    Pink Base Zee...

     Zee Base Pattern....


    With Golden Base....


    Zee Base Pattern.....